“The most dangerous thing about a band saw is that it’s so safe.”
If measured in terms of workshop accidents, the band saw is clearly safer than a table saw or mitre saw. However, this does not mean that it does not pose dangers.
With a relatively small blade and quiet operation, it is easy to forget that the blade on an average 14” band saw moves at over 3,000 fpm (feet per minute) which is over 50 feet per second.
And in most uses, the operator’s hands are in very close proximity to the blade. Accordingly, it is not surprising that when bandsaw accidents do occur, they most commonly involve amputations of finger(s).
A member of the Guild recently had an accident on his bandsaw. While considerable damage was done to the saw, thankfully he was not injured. However, the incident warrants repeating some safety notes concerning this tool.
1. Radius and Blade Width
Never try to cut a radius that is too small for your blade. Using an oversized blade puts tremendous pressure on the blade (and your machine) and poses a very real danger of the blade binding/twisting, or worse yet, shattering. The diagram on the right shows the absolute minimum radius for various blade widths.
The 5 minutes it takes to switch over a blade is a small price to pay to retain all of your fingers.
2. Teeth per Inch (TPI)
Rarely, if ever, will a turner need a nicely finished cut on a blank. Therefore forget about blades with a large number of TPI (teeth per inch).


I recently had a Man vs Bandsaw incident where the Bandsaw won.
It was, of course, all operator error. On my newly purchased G0514X2 I had installed a Lennox bi-metal 1/2×14 blade to cut a number of dry blanks and boards. A while later I cut some green logs. The initial cuts looked like the wood was planed. Unbelievably smooth. So, I continued cutting more logs but noticed that they were getting harder to cut. Finally, one blank was really not cutting so I began to push harder and harder and then…YOW. Blood. Got 2 knuckles on my right hand. Not bad enough to go to the hospital but a nasty cut anyway. I discovered that the the teeth had clogged. The blade was cutting, but gumming its way thru the log. [Sawmill Creek Forum]
For preparing bowl blanks, most professional turners recommend a blade width of between 3/8” to 1/2” with 3 or 4 tpi.
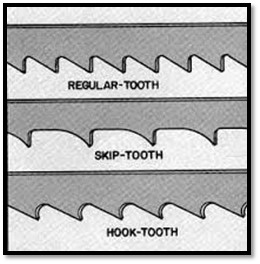
3. Hook Tooth or Skip Tooth
While band saw blades are available in many different tooth configurations, the most common ones used for turning blanks are the hook tooth and the skip tooth. A hook tooth blade has deeper gullets which means that it will clog less frequently when used on green wood. However, its aggressive cut will have a greater tendency to pull the wood into the blade. Conversely, a skip tooth cut will pull less than a hook tooth blade and thus will be easier to control. However, it may tend to clog more often on green wood. Be aware of which configuration you are using and these tendencies.
4. Use a sharp blade
The importance of sharp tools is not restricted to turning chisels. Periodically inspect your band saw blade to ensure that it is sharp.
Forcing a bandsaw blade through the cut with a dull blade stretches the back of the blade and compresses the front edge, allowing a bow to develop in the blade while attempting curved cuts. Once the blade begins to develop a bow, it becomes even harder to follow a curved line; there is so much pressure on the inside of the cut that the blade will have a tendency to cut in a straight line instead of following the curve of the bowl blank. The more force the operator applies to turn and cut the blank, the more the blade begins to bow and an accident is in the making. (Keith Tompkins, Bandsaw Safety)
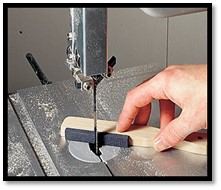
5. Dress the back edge of the blade
The rear (non-cutting edge) of a bandsaw blade is square. Rounding over the back edge of the blade will minimize the likelihood of binding and produce a smoother motion.
While any abrasive can be used, most suggest a knife-sharpening stone. While many suggest doing so with the saw running, since all you are doing is smoothing the edges, it only takes a minute to round both edges by holding a stone at a 45-degree angle while turning the (unplugged) saw by hand.
6. Set the Blade Guard
The guard should be set approximately 1/8” above the stock in order to minimize flexing of the blade. If you are cutting dimensioned stock (top and bottom are parallel) it will also provide some protection from a finger being pulled into the blade.
Obviously, there is no protection if you are cutting a blank with a natural (rounded) top since the blade is only buried at the top of the cut.
7. Adjust the Feed Pressure: End Grain and Cross Grain
In almost all cases, cutting a bowl blank involves cutting with the grain (ripcut) and across the grain (crosscut). As is the case in turning, ripping cuts require more force (since you are cutting end grain fibres) than when you are cutting across the grain. It is important to be aware of changes in grain cutting (and thickness of the log) and to adjust the amount of pressure you are exerting.
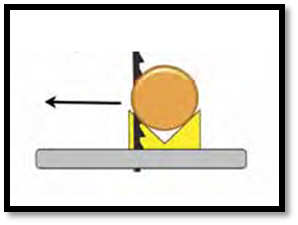
8. Danger Areas and Hand Placement
In his article on band saw safety Keith Tompkins suggests that there are always 2 (and sometimes 4) danger points in cutting a blank.
As indicated by blue X’s in the diagram to the right, they are the places where the blade exits from the wood. As the blade nears this point, there is a rapid drop in resistance and the blade jumps forward, potentially pulling the operator’s fingers into it.
While he notes the importance of reducing/slowing feed pressure at these points, he also suggests that the safest course is to place your hands in the locations indicated in the diagram. In particular, the left hand is behind the saw blade as the blank nears an exit point. He adds that a slight bend at the left elbow will also ensure that the operator’s arm is well away from the blank.
Alternatively, Alan Lacer prefers to have both hands on the “right” side of the blank, well away from the blade, and to rotate the blank from the side. He also suggests that you use a red marker to highlight the danger area on your saw’s table as a visual reminder.
9. Keep the Workpiece Flat on the Table
Always ensure that bowl blanks (or any wood being cut) sit flat on the table of the bandsaw. Any gap between the blank and the table where the blade enters the wood will cause the wood to be pulled toward the table with enough force to damage or break the blade. [Keith Tompkins, Bandsaw Safety]
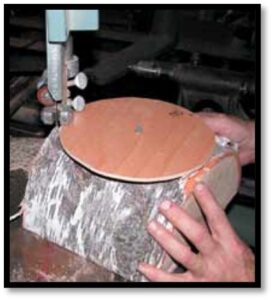
10. Templates
In order to assist you in preparing blanks, make a set of round templates in various sizes which can be secured with a nail to the workpiece. While you can use thin plywood, thick cardboard works fine.
Remember that the objective in a bowl blank is to get a rough round; you are not looking for a perfect circle.
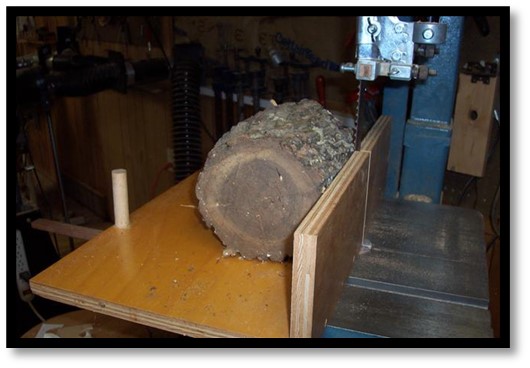
11. Cutting Round Stock
Never cut round stock, such as a log or a turned cylinder, without using some holding jig to secure the workpiece. Otherwise, the stock will rotate into the blade with considerable force.
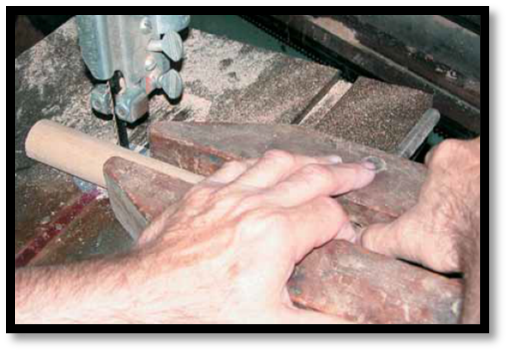
To cut a cylinder, use a v-block or better yet, a clamp with the clamp arm resting on the table.
For cutting doweling, a handscrew can be used to secure the piece.

The photo on the right shows a simple jig for cutting a log. Note: the log should be secured to the upright fence with clamps or screws.
If cutting a hollow form or a bowl with partial cuts, you can use a device similar to the John Beaver Wave Bowl Jig that was discussed in the December 2023 newsletter. For a short video showing the jig at left in operation, check this out: http://www.aswoodturns.com/2015/09/bandsaw-jig/

Further Reading
Alan Lacer, The Woodturner’s Bandsaw, American Woodturner, Fall, 2004
Keith Tompkins, Bandsaw Safety, American Woodturner, August 2011